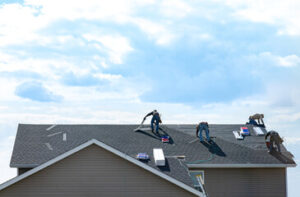
Whether you need to repair or replace your roof, it’s best to do so before severe storms hit. Roofing contractors have access to the equipment needed (ladders, scaffolding, fall protection) and know how to safely work on challenging roof slopes.
Examine shingles, gutters and roof edges for damage. Also check the flashing around vent pipes, dormers and roof-pitch transition points.
Your roof’s shingles act as the first line of defense against moisture infiltration. Unfortunately, like any protector, they can get damaged over time. Isolated cracks and fissures are a common occurrence, but if left unattended, they can lead to widespread damage and those dreaded ceiling leaks. A simple shingle repair can prevent a small problem from turning into a major one, but it’s important to act quickly when you spot a crack or fissure.
The first thing you’ll need to do is remove the shingle that’s affected by the damage. Use a pry bar to carefully raise up the surrounding shingles and pull them loose. This will expose the nails that hold the shingle in place, and it’s important to take note of their location so that you don’t accidentally damage any undamaged shingles as you work. Once the existing shingle is removed, you’ll need to assess the damage and determine how many new ones will be needed to replace it.
Once you’ve assessed the situation, you can begin removing any remaining nails with your pry bar. When you’re ready to install a replacement shingle, make sure to follow the directions on the packaging, and use a tool belt to keep all your tools within reach.
Before you nail down the replacement shingle, apply a layer of roof cement over the entire surface to help ensure that it adheres properly. After applying the cement, be sure to cover it with a layer of granules that will help camouflage the sealant and protect your shingle from the elements. If you don’t have a bucket of shingle granules, check your gutters to see if there are any accumulated granules that can be used as a cover for the repair. Alternatively, you can purchase colored roof cement at most home improvement stores.
Damaged Flashing
Flashing is the thin metal strips installed around roof penetrations, including chimneys, vents, and skylights, to prevent water infiltration. Flashing is often the culprit of roof leaks rather than shingles, and it’s vital to keep an eye out for signs of flashing damage or deterioration. Flashing that is leaking or damaged can result in rotting wood, weakened insulation, and mold growth. It can also cause structural damage by weakening the roof deck, rafters, and foundation of your home.
Flashing can become damaged due to age, normal wear and tear, or extreme weather. It is not uncommon for flashing to develop rust spots or corrosion as the metal begins to oxidize. It can also be weakened from hail or wind-driven debris that damages the roofing surface underneath it. Flashing may also become dislodged or lifted from the roof due to age, ice damming, or other factors.
There are a few ways to repair damaged flashing, depending on the severity and extent of the damage. In some cases, the problem can be solved by simply cleaning the area and applying new flashing tape. This is a quick fix that will provide temporary relief until you can have a professional roofer come out to do a more extensive repair.
A more extensive repair requires removing the old flashing and replacing it with new material. This process is usually done with the help of a professional roofing contractor, as it involves working on a steep sloped roof and requiring special safety equipment, such as a ladder with proper support and fall protection. This is a job that should only be completed by an experienced roofer to prevent serious injury or property damage.
Regular inspections and maintenance can help identify problems with flashing early and address them promptly. This can save you money on expensive roof repairs and reduce the risk of water intrusion in your home, which can lead to rot, mold growth, reduced energy efficiency, and devalue your property. Establish a regular monthly or seasonal habit of visually inspecting your roof, and remember to take the proper safety precautions when accessing it.
Damaged Built-Up Roofing (BUR)
Built-up roofing (BUR) is a system of layers that protects commercial buildings from harsh weather conditions. The multiple layers of tar paper, felt and ply sheets make BUR one of the most durable roof systems available. However, even the most robust multi-ply roofing can develop leaks if not properly maintained and inspected regularly.
As a general rule, BUR roofs are more expensive to install and repair than single-ply membranes. However, the additional protection that BUR offers may be worth it in the long run for many building owners.
Leaks in BUR roofs are most commonly caused by deterioration of the asphalt sealant. This can occur if the roof is not cleaned and maintained as recommended by your roofing contractor.
Blistering is another common problem that can damage BUR roofs. The blisters appear as bubble-like protrusions on the roof surface. They are usually the result of trapped air or moisture that expands when it is heated by sunlight. The resulting blisters can cause damage to the underlying roofing components. Blistering can also be caused by poor installation, or when mechanical systems are installed on the roof.
In addition to leaking, other issues that can affect BUR roofs include erosion and bare spots. Erosion occurs when the surface of the roof begins to wear away, exposing the underlying bitumen and reinforcing fabrics. This can be caused by heavy foot traffic, wind and rain, as well as age and UV radiation. Regular maintenance can help prevent erosion by conducting routine inspections, minimizing foot traffic on the roof and, when necessary, using walk pads to distribute weight evenly across the roof surface.
To repair eroded areas of a BUR roof, the roofing contractor must first remove any debris and contaminants from the damaged area. Then, the contractor must prepare the area for the application of a BUR patch. To promote thorough adhesion, the area should be free of any bare spots, gravel or loose surfacing material.
Once the area is prepared, the roofing contractor can apply a new asphalt sealant to the damaged areas of the roof. Then, the contractor can apply a granular surfaced modified bitumen membrane cap sheet. This is typically done by cutting a piece of granular surfaced modified bitumen that is 225 mm (9 in) wide and the same length as the split in the roof. The cap sheet should then be centered over the split and fastened with metal flashing and termination bars as described in the Typical BUR Membrane Repair Procedure above.
Damaged Gutters
Gutters serve a vital purpose for homeowners by channeling rainwater away from walls, fascia boards and foundations to prevent water damage. Gutters should be inspected regularly for cracks and holes that can lead to gutter leaks, which in turn can cause severe damage to your home’s roof and siding. Gutter leaks are also a common source of wood rot, which can further weaken the fascia board and compromise the integrity of your home’s structure. Regular gutter inspections and routine repairs will ensure that your gutter system is fully functional.
Cracked or leaking gutters are typically caused by damaged or aging gutters, downspouts and the mounting hardware. These problems can be fixed relatively easily by using roof sealant and a rubber patch. To fix a gutter hole, first clean the area well and remove any loose or rusty debris. Next, use a wire brush to scrub away any minor rust spots and then apply metal primer to the area to protect against future rusting. After repairing the damaged area, apply a thin layer of roof sealant to the crack or hole. Use a putty knife to spread the sealant in a thin, even layer and allow it to dry according to manufacturer instructions.
If your gutters are sagging, it is likely that the hangers or spikes that hold them in place have pulled out of the wood or the brackets have become warped. Replace the old spikes or fascia hanger brackets with new ones that are properly positioned to support the gutters in their proper location. A sagging gutter can eventually lead to the failure of the entire section of gutter, which can be very costly to replace.
In addition to causing structural damage to your home, gutters that are clogged with leaves and other debris can overflow, which can lead to water damage on the roof and around the foundation of your house. Clogged gutters can also create mold and mildew, as well as provide breeding grounds for mosquitoes and rodents. Gutter cleaning and regular maintenance are essential for ensuring that your gutters are ready to face the heavy rains of spring and fall without any problems.